Contents
|
|
Magnifying and Reading Text
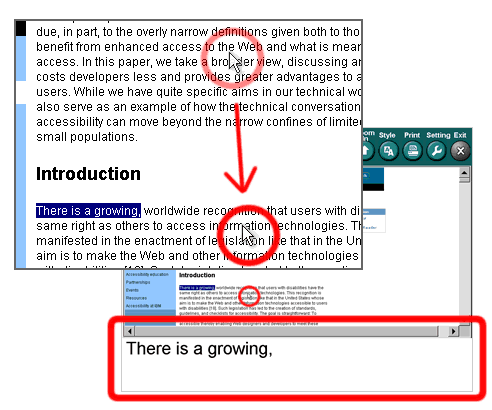
- Move the mouse pointer to the text that you want to be magnified. The text is gradually magnified from the beginning of the paragraph, and reading begins. You do not have to click the mouse.
(Click: Pressing the left button one time. )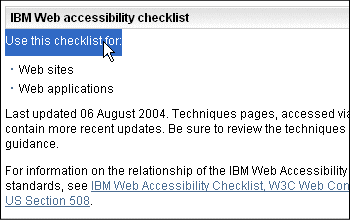
- The magnification window shows the section of the Web page where the mouse pointer is pointing. This portion will be read out loud.
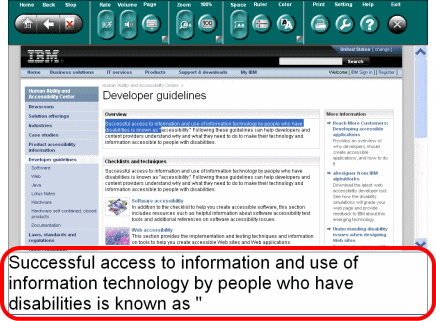
- The text will be read continuously until the end of the paragraph, at which point it stops.
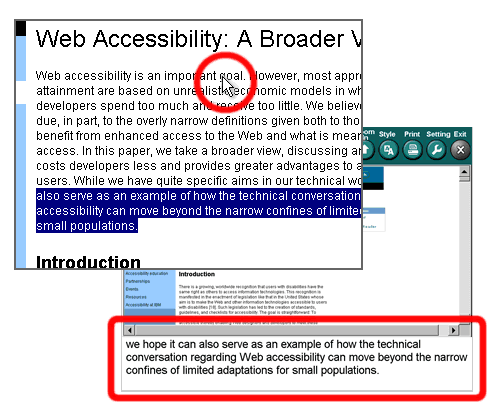
- To continue reading, please move the mouse to the next paragraph.
|
Notes on Easy Web Browsing Reading
- Each paragraph is read from the beginning to the end.
Easy Web Browsing cannot read only one sentence in a paragraph or from the middle of a paragraph. - If you point to a paragraph, reading begins from the beginning of that paragraph.
You do not need to point the mouse to the beginning of the paragraph. - Do not move the mouse while Easy Web Browsing is magnifying or reading text.
Reading will stop if you move the mouse, and the reading portion will be switched to the new portion.
- Responses may be delayed if you are reading a frame, long page, etc.
- Some pages may not be readable.
|
Operating Easy Web Browsing - Other Options
|
|
|
Setting Easy Web Browsing Options
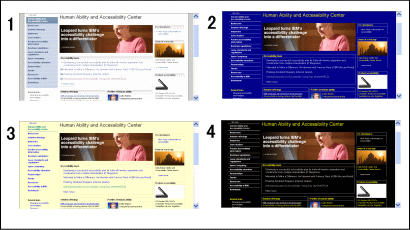
You can change Easy Web Browsing speech rates, screen display sizes, and color settings, using buttons on the upper portion of the screen. Changed settings are not changed until the next time you start Easy Web Browsing.
| ||||||||||||||||||
|
|
| ||||||
| ||||||
|
| ||||
| ||||
|
Changing Easy Web Browsing Advanced Settings
You do not need to read this section for ordinary operations.
Easy Web Browsing Requirements
Operating System
Browser
You can check the version you are using by accessing Internet Explorer Help, About. If your version is not compatible, you can upgrade to a later version via the Internet.
Working with PDF Files
- Adobe® Reader® 6.0 full version
- Adobe® Reader® 7.0 full version
- Adobe® Reader® 8.0 full version
- Adobe® Reader® 9.0 full version
- Adobe® Acrobat® 6.0
- Adobe® Acrobat® 7.0
- Adobe® Acrobat® 8.0
- Adobe® Acrobat® 9.0
Follow the below steps to confirm the version. If you find you have not installed a full version, uninstall the current Acrobat Reader and install a full version.
- Start Acrobat Reader.
- Open "help" menu from the toolbar.
- Choose "About Adobe Plug-Ins".
- Make sure that the following plug-ins are registered in the newly opened "About Adobe Plug-Ins" window.
- Acrobat Accessibility
- Make Accessible
To work with PDF files, the "Display PDF in browser" option should be "on".
From the "Edit" menu of the Adobe Reader or Adobe Acrobat, select "Preferences"-"Internet"-"Web Browser Options", and check the "Display PDF in browser" checkbox.
|
Hardware requirements
The following conditions are required when using Easy Web Browsing.for Windows XP
- CPU (processor): Pentium 500MHz or higher
- Installed memory (storage capacity): 128MB or higher
- Available hard disk capacity: minimum of 500MB free space
- Display (display capacity): XGA (1024x768 pixel) 65,536 colors or more
- Sound (sound source): 16 bits or more that are compatible with the required OS above
- Network (communication environment): Broadband connection of 512Kbps or higher (ADSL, CATV, etc.)
for Windows Vista
- CPU (processor): 32-bit x86 or 64-bit x64 processor running at better than 1GHz
- Installed memory (storage capacity): 512MB(Home Basic) or 1GB or more
- Available hard disk capacity: minimum of 500MB free space
- Display (display capacity): XGA (1024x768 pixel) 65,536 colors or more
- Sound (sound source): Windows-compatible 16-bit or higher sound card
- Network (communication environment): Broadband connection of 512Kbps or higher (ADSL, CATV, etc.)
for Windows 7/8
- CPU (processor): 32-bit x86 or 64-bit x64 processor running at better than 1GHz
- Installed memory (storage capacity): 1GB(32bit version ) or 2GB(64bit version) or more
- Available hard disk capacity: minimum of 500MB free space
- Display (display capacity): XGA (1024x768 pixel) 65,536 colors or more
- Sound (sound source): Windows-compatible 16-bit or higher sound card
- Network (communication environment): Broadband connection of 512Kbps or higher (ADSL, CATV, etc.)
Problems and solutions
User authority
When you use Easy Web Browsing, your user authority needs to be administrator authority. If you have logged onto the personal computer being currently used with user authority other than administrator authority, please use Easy Web Browsing after logging in again as a user with administrator authority.
The initial download fails before completion.
(Firewall software: Program to protect PCs from outside intrusion and make them safe)
Text is not read out loud
A. The speech program is being downloaded.
Reading does not start while there is the display "Downloading" in the operation panel. Please try again after the downloading has been completed.
B. On the setting screen, one or both of the checkboxes "Automatically enable speech when TTS is available" and "Enable speech sound" are unchecked.
Please check and do the setting, if necessary, through the following steps:
- Display the setting screen by clicking the Setting button in the operation panel.
- Display the "Speech sound" function by clicking "Speech".
- If one or both of the checkboxes "Automatically enable speech when TTS is available" and "Enable speech sound" are unchecked, check the boxes by clicking them.
- Press the "Close" button to close the setting screen.
The checking of the checkboxes will be followed by the display "The audio device is mute. Do you want to activate audio?". Select Yes. (If you select No, the checkbox becomes off. Check the box again to enable the speaker.)
C. The page is written in a language for which Easy Web Browsing is not ready.
If a page opened is written in a language for which Easy Web Browsing is not ready, it is not read out loud.
D. When a problem is in the page structure or a page cannot be loaded correctly:
Refreshing the page by clicking "F5" key may enable reading.
Sound effect is inactive
A. On the setting screen, Selection of Sound Effect is Mute.
Please check and do the setting, if necessary, through the following steps:
- Display the setting screen by clicking the "Setting" button in the operation panel.
- Display the "Sound effect" function by clicking "Others".
- If "None" is selected in Selection of "Sound effect type", select any other, such as "Sound 1", by clicking it.
- Press the "Close" button to close the setting screen.
B. In the speaker volume setting in Windows, the SW Synthesizer (or MIDI) setting is mute.
- From the Windows start menu, select the control panel.
- (With Windows XP) Select Sound, Voice, Audio Device, and then select Adjust System Sound Volume.
- On the Sound and Audio Device Property screen, press the Advanced Setting button for Device Sound Volume.
- In the Master Sound Volume window, uncheck (turn off) Mute for SW Synthesizer (or MIDI) and set the volume to a proper level.
- Close all open windows
Reading preparation is not completed (The reading voice software cannot be downloaded)
Speech response is slow.
Please wait a little until responses are made after you move the mouse.
Speech is not correct.
This happens because the voice synthesis engine of Easy Web Browsing is not compatible.
Speech omits some portion of a page. Easy Web Browsing speaks text not pointed to by the mouse pointer.
(Page layout: Represents page configuration, and ways of creating pages)
Reading ignores the designated speech point.
(Mail magazine: Magazine that is regularly issued to subscribers via e-mails.)
(HTML: Language used to build and display Internet pages.
Operation buttons and the setting panel have disappeared.
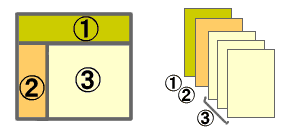
When the screen is magnified, the page layout is corrupted
A change of style is not reflected after the page is moved.
Please wait while the change in style is reflected.
Responses are slow when pages or a magnification rate is changed
- Display the setting screen by pressing the "Setting" button.
- Click "Layout" to display "Scrollbar width" function.
- With "Scrollbar width", select "No Adjustment" by clicking it.
- Press "Close" to close the setting screen.
Character strings cannot be selected with the mouse
Note : With this setting, no reading is done.
- Display the setting screen by pressing the "Setting" button.
- Display the "Magnification" function by clicking "Screen".
- Turn off "magnify reading text" by unchecking it.
- Display the "Speech sound" function by clicking "Speech".
- Turn off "Enable speech sound" by unchecking it.
- Click "Other" to display "Mouse" function.
- Turn off "Enable mouse dragging scroll" by unchecking it.
- Press "Close" to close the setting screen.
Easy Web Browsing aborted with an error display.
A page that should be open is not visible
A. The page is hidden behind the current page:
Depending on timing, a page opened may be hidden behind the previous page. In cases like this, please try pressing the Tab key while holding down the Alt key. The intended page will appear after a number of tries.
B. The page cannot be opened because of the pop-up blocking function of Internet Explorer:
With Windows XP SP2, the Google toolbar, or the like, Internet Explorer has a pop-up blocking function that automatically closes a page opened. Please temporarily clear these functions so that the intended page can be opened.
A page pop-up window is not displayed in front.
Click the Back button.
(Window :An independent and small screen that is prepared at the startup of a program. An image and document are displayed on such screen.)
(Pop-up: To open a new window automatically and display separate contents on such window.)
Cannot return to the previous page from a pop-up window.
In this case, please restart by clicking the Default button, or return to the previous page by clicking the Back button three times or more.
A small window cannot be maximized when two or more pop-up windows are opened.
If you want to close this pop-up window, click the Close button on that page or, close the pop-up window by clicking x on the upper right corner of the window.
The magnified part moved upward incorrectly after the PC recovered from standby conditions.
In this case, please restart Easy Web Browsing.
(Standby: Conditions in which nothing is displayed on the screen by retaining the conditions immediately before the PC is turned off for the purpose of saving power consumption.)
Easy Web Browsing aborted because software that automatically closes pop-up ads was being used at the same time.
With Internet Explorer or other software, the toolbar is not displayed in place
- Display the setting screen by pressing the "Setting" button.
- Click "Screen" to display "Layout" function.
- With "Scrollbar width", select "No adjustment" by clicking it.
- Press "Close" to close the setting screen.
The start icon is not created on the desktop
How to uninstall from client PC
In Windows XP
When the main Easy Web Browsing (not including voice synthesis programs) is installed on a client PC, program files, setting files, and temporary files are saved to the following directories:
%ProgramFiles%\IBM\WebRD
(Example: C:\Program Files\IBM\WebRD)
%APPDATA%\WebRD (WindowsXP or higher)
(Example: C:\Documents and Settings\Administrator\Application Data\WebRD)
Note: The Application Data directory maybe invisible in Windows Explorer because the default property is hidden. If so, please input %APPDATA%WebRD in address bar directly.
To uninstall Easy Web Browsing from a client system, first uninstall all voice synthesis programs. Then delete all the files related to Easy Web Browsing and the startup icon on the desktop.
The below are the steps of uninstall in Windows XP.
Go into [Control panel]-->[Add or Remove Programs] and delete the following applications.
(If it is being used by the system, you may not be able to delete it. If you are using IBM ViaVoice TTS with other applications, do not delete it.)
- IBM TTS for Easy Web Browsing
- IBM ViaVoice TTS Runtime v(a) - (B) -
where (a) is version, (B) is language
Delete the startup icon on the desktop for running Easy Web Browsing
Delete the directory of %ProgramFiles%\IBM\WebRD (e.g. C:\Program Files\IBM\WebRD)
Delete %APPDATA%\WebRD of every user. (For example: in the case of Administrator, delete the files under the folder of C:\Documents and Settings\Administrator\Application Data\WebRD)
Delete the plug-inGo through the following steps to delete the ActiveX plug-in WebRDC.dll (WebRDCtl Class) in Internet Explorer.
- Close all the Internet Explorer and other active applications
- Start the Internet Explorer
- Delete WebRDC.dll(WebRDCtl Class)
[Tool]-->[Internet Option]-->[General]-->[Setting]-->[Object]-->(Open the folder)-->[WebRDCtl Class]-->Right click-->[Delete]-->Close the opened folder. - Delete Internet Explorer Cache (temporary Internet Files)
[Cancel] (Close the control panel)-->[Delete files]-->[Delete all the offline contents] --> Check --> [OK] - Remove Internet Explorer's access to the network
- Write down the current settings information of the Connect tab
- [Connect]-->[LAN setting]-->[Auto configuration]-->[Auto detect the setting]-->Uncheck
- [Auto configuration script]-->Uncheck
- [Use proxy server to LAN]-->Check
- Input invalid value in [Address] and [Port] (Such as:127.0.0.1 8080)
- [OK]-->[OK]
- Intentionally force an error loading Easy Web Browsing
Input Easy Web Browsing start URL in the address bar of Internet Explorer, it will appear error message of [The page cannot access properly]. - Close Internet Explorer
- Restart Internet Explorer
- Restore Internet Explorer's access to the network
[Tool]-->[Internet Option]-->[Connect]--> Restore the settings recorded in Step 4 part 1
In Windows Vista/7/8.
When the main Easy Web Browsing (not including voice synthesis programs) is installed on a client PC, program files, setting files, and temporary files are saved to the following directories:
%ProgramFiles%\IBM\WebRD (Example: C:\Program Files\IBM\WebRD) %USERPROFILE%\AppData\Local\VirtualStore\Programu Files\IBM\WebRD %APPDATA%\WebRD %TEMP%\Low
The below are the steps of uninstall in Windows Vista/7/8.
The deletion of Voice synthesis engine programGo into [Control panel]-->[Programs] and delete the following applications. (If it is being used by the system, you may not be able to delete it. If you are using IBM ViaVoice TTS with other applications, do not delete it.)
- IBM TTS for Easy Web Browsing
- IBM ViaVoice TTS Runtime v(a) - (B) -
where (a) is version, (B) is language
- Delete the startup icon on the desktop for running Easy Web Browsing
- Delete the directory of %ProgramFiles%\IBM\WebRD (e.g. C:\Program Files\IBM\WebRD)
- Delete the directory of %USERPROFILE%\AppData\Local\VirtualStore\Program Files\IBM\WebRD
- BF3.ini
- BF4.ini
- cache1.0
- Shortcut.ini
- PCSETTING.ini
- Delete %TEMP%\Low\ezweblog.txt and ezweblog.txt_bak.
* %XXX% corresponds to the current environment settings of the OS. Execute set command alone in Command Prompt to display these settings.
Delete the plug-inGo through the following steps to delete the ActiveX plug-in WebRDC.dll (WebRDCtl Class) in Internet Explorer 7.
- Close all the Internet Explorer and other active applications
- Start the Internet Explorer
- Delete WebRDC.dll(WebRDCtl Class)
- [Tool]-->[Internet Option]-->[General]-->[Delete]-->[Delete All]-->[Delete files and settings that have been stored by Add-ons]-->Check-->[Yes]-->[OK] -->Close the Internet Option dialog.
- [Tool] -->[Manage Add-ons] -->[Enable or Disable Add-ons] -->[Add-ons that have been used by Internet Explorer](the Show list)--> Delete [WebRDCtl Class(Enable)] -->[Add-ons Installer] :Continue--> [OK]
Check if [WebRDCtl Class] is enable before deleting it. If it is disabled, enable it first.
- Close the Internet Explorer.
|

